Last updated: February 21, 2023 at 1:12 PM
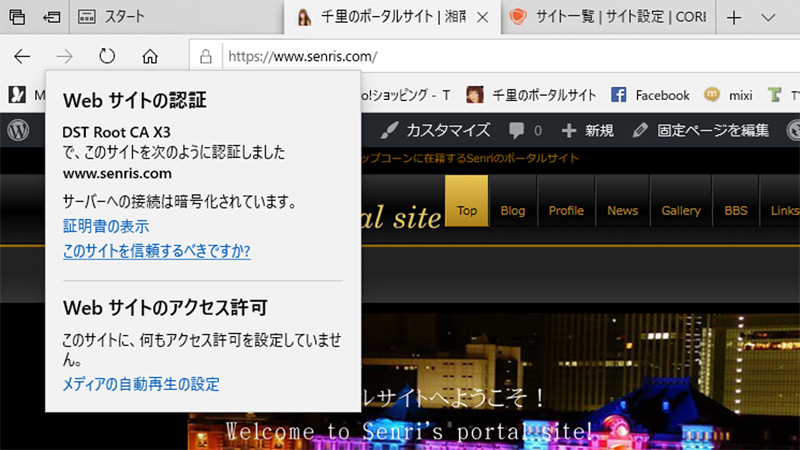
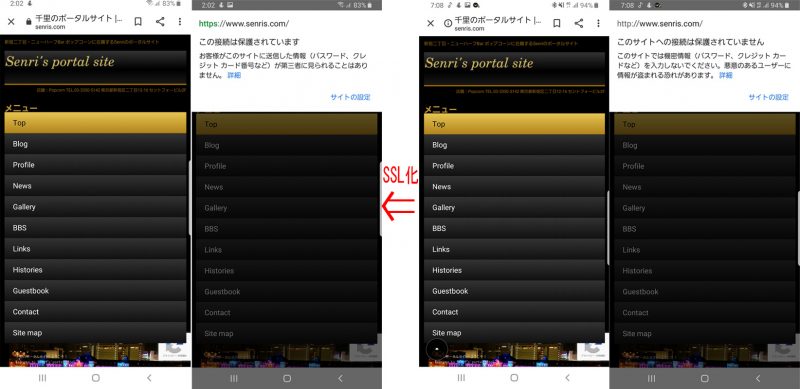
We have completed the work to convert this website built with WordPress to always-on SSL (https).
At the same time, we succeeded in restoring the number of Facebook "Likes" that had disappeared due to SSL!
Nowadays, SSL (encryption) is commonplace for any site, and it is clear that sites that do not have SSL are treated with low ratings even in Google's SEO ranking.
Although it is late, we have decided that it is unavoidable to convert the site to SSL now, so we have decided to implement the SSL conversion of this website.
The actual communication protocol after conversion to SSL is not SSL (Secure Sockets Layer), but TLS (Transport Layer Security) communication (TLS 1.2/1.3). The Netscape-era SSL protocol is dead because of security breaches.
By the way, the core server supports TLS 1.3. For Windows 10, TLS 1.3 (experimental stage) can be set from "Network and Sharing Center ⇒ Internet Options ⇒ Advanced Settings". Setting to TLS 1.3 enables faster and stronger encrypted communication.
I have summarized these series of work procedures below, please read for your reference.
☆ This work consists mainly of the following procedures.
1. SSL
1. 1 Server SSL settings
1.2 Change address to “https” in WordPress general settings
1.3 Correct internal database links using WordPress plugin "Search Regex"
1. 4 Fix internal links in theme programs
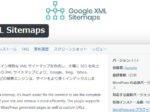
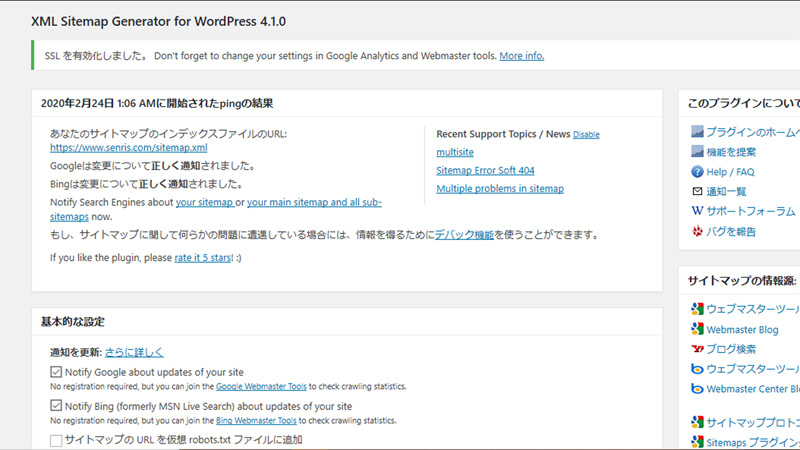
1.5 Run the WordPress plugin "Site Map Generator" to build a new site map
1.6 Change Google Analytics properties and add views
1.7 Add property to Google Search Console2. 301 redirect settings and recovery of Facebook likes
2.1 Suppression of output of OGP tag of Jetpack (functions.php)
2.2 Set the og:url of the article page you want to transfer to the URL before SSL
2.3 Show old URL only to Facebook crawler in 301 redirect setting of “.htaccess” for SSL3. Check with the Open Graph Object Debugger
1. SSL
1.1 Server SSL Configuration
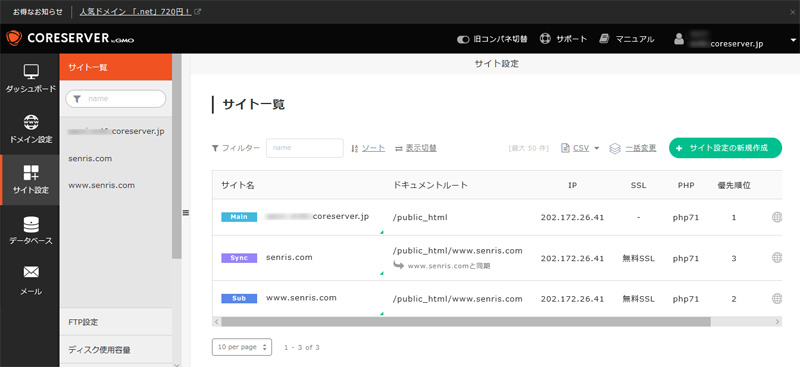
Log in to the control panel of the rental server "Core Server" of this site and select "Free SSL" in the site settings.
In addition, in preparation for unforeseen circumstances, WordPress plug-in BackWPup So, back up your database and WordPress system in advance.
1.2 Change address to “https” in WordPress general settings
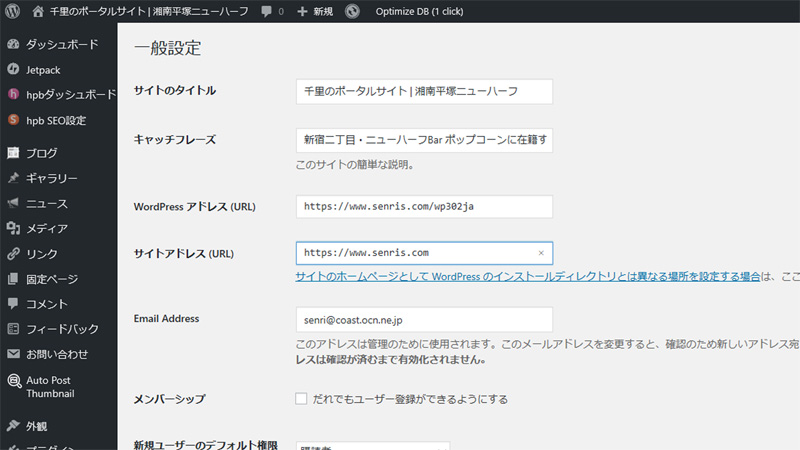
In the WordPress general settings screen, change the WordPress address and site address from “http” to “https”.
2021.03.17 Update
With the release of WordPress 5.7, "HTTPS status check" was added to site health, and it became possible to easily switch to https (SSL) from the "Update site to use HTTPS" button.
It seems that the internal link correction process by Search Regex presented below is also done automatically.
1.3 Correct internal database links using WordPress plugin "Search Regex"
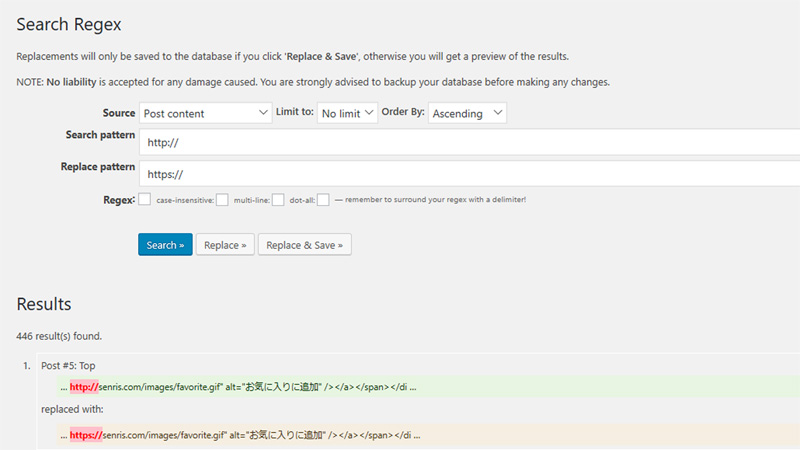
WordPress plugin Search Regex to change internal links in your WordPress database from “http://” to “https://”. Enter the URL to be replaced “http://” in “Search pattern” and the URL after replacement “https://” in “Replace pattern”.
Once after confirming the replacement result with the "Replace»" button. Replace & Save in bulk.
In addition to Search Regex, useful plugins Really Simple SSL Unfortunately, if you use this plugin, all internal links of the same domain will be replaced with “https://”, so please refer to “2.2 og: We do not recommend this plug-in because it will not be possible to process url to be a pre-SSL URL.
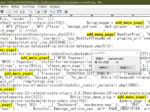
1.4 Fix internal links in programs
If the SSL key mark is not displayed despite the above work, investigate and correct the internal links described in the theme program "This site is a homepage builder (HPB)" and plug-ins.
(1) Fixed theme program (HPB)
Fixed the URL in the CGI call part of the access counter below.
📌 front-page.php
<iframe width="300" height="100" frameborder="0" align="middle" scrolling="NO" seamless="seamless" name="counter" src="https://www.senris.com/counter.shtml">この部分はインラインフレームを使用しています。</iframe>
📌 header.php
<!-- アクセスカウンタのCGI呼び出し(TOP以外のページ) -->
<IMG src="https://www.senris.com/cgi-bin/TCount/tcount.cgi?count_sen&1" height="0" width="0">
In addition, the following CGI programs have been modified.
・cgi-bin/TCount/ ... Graphics counter: Corrected two Perl programs
・cgi-bin/launcher/ … Launcher: Fixed one Perl program
・cgi-bin/joyful/ … Image bulletin board: Corrected 7 Perl programs
(2) Modify HPB plugin
Even with the above work, the lock mark was still not displayed, so after further investigation, I found that there was also a problem with the HPB dashboard plug-in. This problem was successfully solved by correcting the old "http://" part of the plug-in's social button-related program description!
📌 social_buttons.php@hpbtool (add button fix to Hatena bookmark)
$hatena_bookmark = '<div><a href="https://b.hatena.ne.jp/entry/'.get_permalink().'" class="hatena-bookmark-button" data-hatena-bookmark-title="'.get_the_title() .'" data-hatena-bookmark-layout="'.$hatema_bookmark_layout.'" title="このエントリーをはてなブックマークに追加">
<img src="https://b.st-hatena.com/images/entry-button/button-only.gif" alt="このエントリーをはてなブックマークに追加" width="20" height="20" style="border: none;" /></a><script type="text/javascript" src="https://b.st-hatena.com/js/bookmark_button.js" charset="utf-8" async="async"></script></div>
📌 social_buttons.php@hpbtool (Fix the Send via LINE button)
$send_by_line = '<div><a href="https://line.me/R/msg/text/?'.urlencode(get_the_title()) .'%0D%0A'.urlencode(get_permalink()) .'" class="send-by-line-button" target="blank">
<img src="'.HPB_PLUGIN_URL.'/image/social_button/'.$social_button_id.'.png" width="'.$line_button_width.'" height="'.$line_button_height.'" alt="LINEで送る" style="border:none; width:'.$line_button_width.'px !important; height:'.$line_button_height.'px !important;"></a></div>
1.5 Run the WordPress plugin "XML Sitemaps Generator" to build a new sitemap
The steps below are an example if you are using the XML Sitemaps Generator. If you're generating an XML sitemap with something like Yoast SEO, check for notifications in that plugin's admin panel.
If the key mark is displayed in the address bar of the browser and the SSL conversion is successful, the following WordPress plugin XML Sitemaps Generator to build a new sitemap.
1.6 Change Google Analytics properties and add views
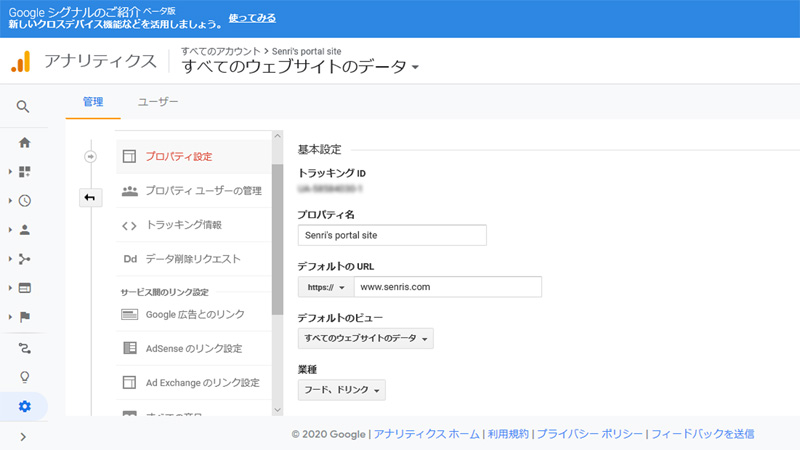
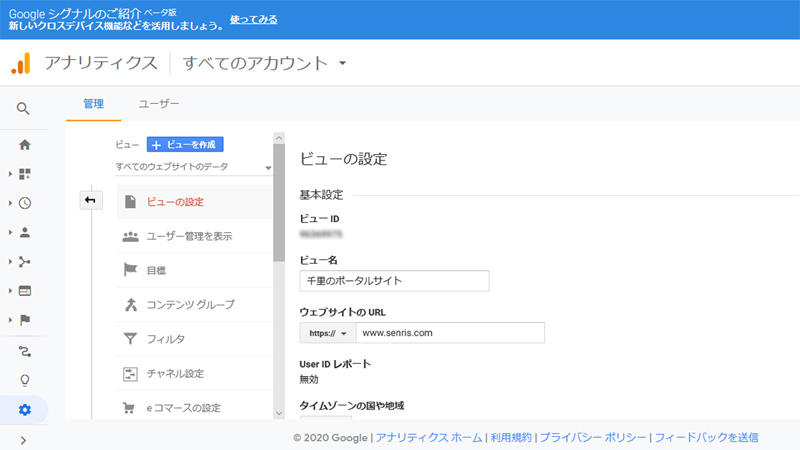
Google Analytics Log in to and change the default URL to “https://” in the property setting from the administration menu. Also, continue to set the website URL to “https://” in the view settings. View configuration does not require a view to “http://”. Domains are integrated into the view of “https://”.
1.7 Add property to Google Search Console
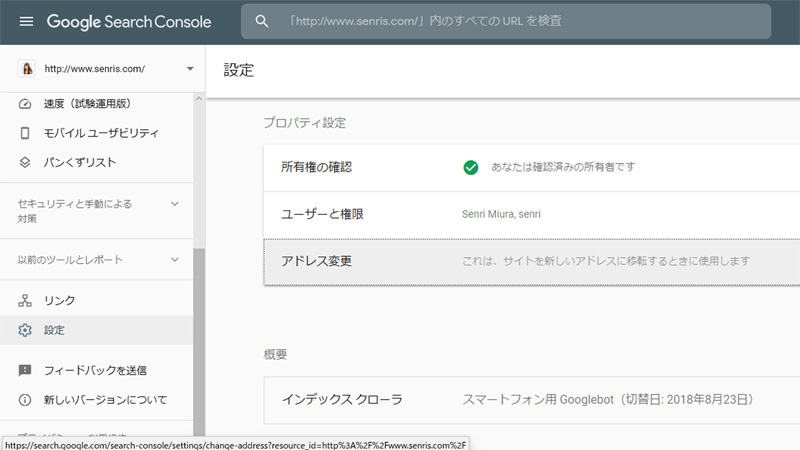
Google Search Console Login to and add “https://” property. If the ownership has been confirmed on the first setting screen, all you have to do is add the property. Both add properties for domains with “www” and without “www”.
2020.3.17 Postscript
Since the new URL is not registered in Google's search engine, after performing URL inspection from the "URL inspection" menu of Google Search Console, register the new URL (https://~) in the Google index. request.

2020.10.08 Postscript
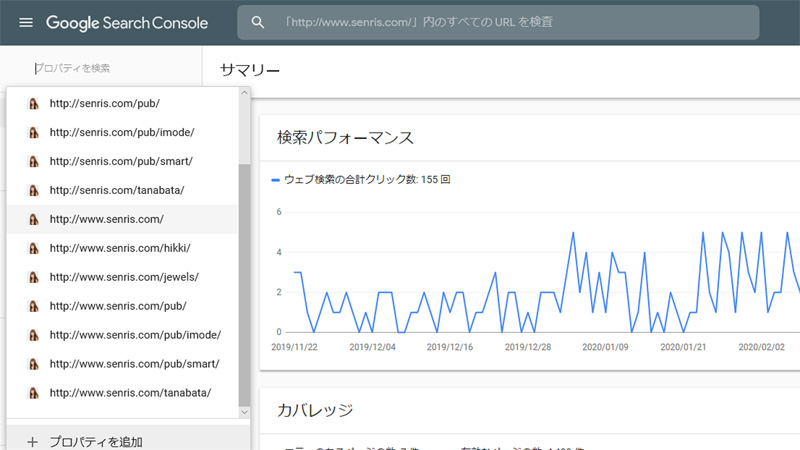
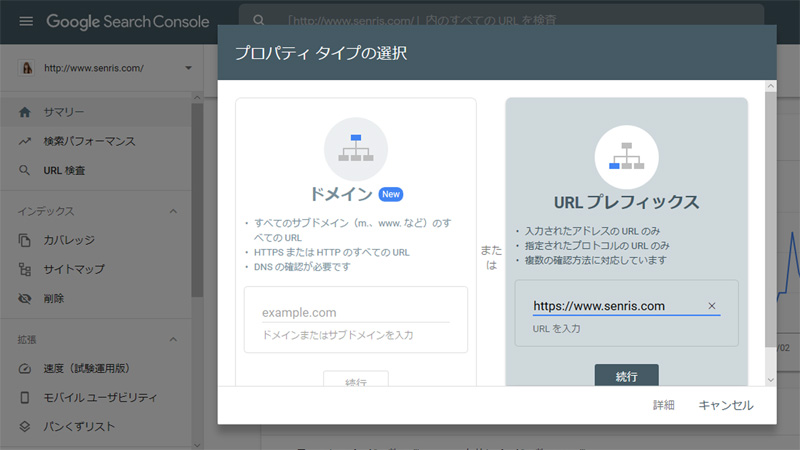
If you specify a domain in the property type selection of Google Search Console, you can integrate the old protocol http and SSL https URLs and collectively manage them with the domain.
🍷 Welcome to the Google Search Console
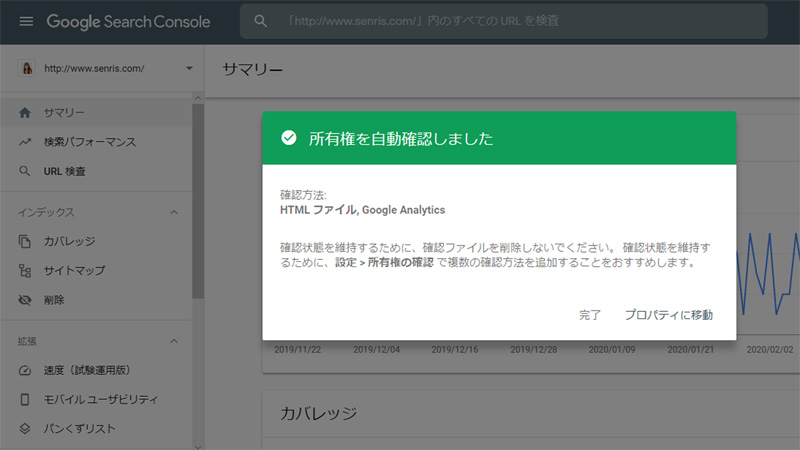
Domain property registration requires verification of ownership by DNS records.
By the way, on the core server, set the DNS for the domain at value-domain.com as follows.
(Line 4 is used for Google ownership verification)
a * 202.172.26.41
mx @ 10
txt @ v=spf1 ip4:202.172.26.41 ~all
txt @ google-site-verification=***************
2. Setting up 301 redirects and recovering Facebook likes
2.1 Suppress output of OGP tags in Jetpack (functions.php)
If Jetpack is installed and the theme plugin is also equipped with the SEO function, the OGP (Open Graph protocol) tag will be output twice, so the theme program "functions.php" has the following you need to add a line
/* 【Jetpack】OGPタグの出力抑制 */
add_filter( 'jetpack_enable_open_graph', '__return_false' );
2.2 Change the og:url of the article page you want to transfer to the URL before SSL
Set the OGP tag "og:url" of the article page you want to transfer to the old URL before SSL.
This was addressed by modifying the program “social_buttons.php” called by the theme plugin hpb Dashboard (“hpbtool”). In addition, "20200206" is the date of the article before SSL.
<?php if(20200206 >= intval(get_the_date( 'Ymd' ))){
  // SSL化前の記事だけOGPタグのURLを古いURLに変更する
  $STR_OGP_URL = str_replace( 'https://', 'http://',get_permalink());
}else{
  $STR_OGP_URL = get_permalink();
} ?>
<meta property="og:url" content="<?php echo esc_url($STR_OGP_URL); ?>"/>
2020.04.02 update
It seems to be a change in Facebook specifications, but from April 1, 2020, when the OGP tag on the TOP page is changed to the old URL, the following error is displayed when debugging with Facebook's share debugger, and the old URL's "Like!" " has become 0.
⚠Issues that need to be fixed
Circular Redirect
A canonical URL could not be resolved because the redirect path contains a cycle.
If the old URL of the top page is 301 redirected to the new URL's top page (https), it seems that the old URL cannot be specified with the OGP tag "og:url".
Therefore, I modified the program “social_buttons.php” as follows.
* 2022.07.25 Update – Code fix due to URL normalization
  $STR_DATA_HREF = get_permalink();
  if ( 20200206 >= intval(get_the_date('Ymd')) ) {
      if ( $STR_DATA_HREF !== 'https://www.senris.com/' and $STR_DATA_HREF !== 'https://senris.com/' ) {
	      // TOPページ以外でなおかつSSL化前の記事だけdata-hrefのURLを古いURLに変更する
		    $STR_DATA_HREF = str_replace( 'https://', 'http://',$STR_DATA_HREF);
	    }
  }
2.3 Show old URL only to Facebook crawler in “.htaccess” 301 redirect setting for SSL
Only the Facebook crawler will allow old URLs to be seen, otherwise it will perform a 301 redirect.
Added the following script to “.htaccess”.
# BEGIN SSL Redirection
<IfModule mod_rewrite.c>
# SSL Redirect - Facebookクローラーは例外で、HTTPならリダイレクトさせない
RewriteEngine On
RewriteCond %{HTTP_USER_AGENT} !(Facebot|facebookexternalhit/1.1) [NC]
RewriteCond %{HTTPS} off
RewriteRule ^(.*)$ https://%{HTTP_HOST}%{REQUEST_URI} [R=301,L]
</IfModule>
# END SSL Redirection
3. Confirmation with the Open Graph Object Debugger
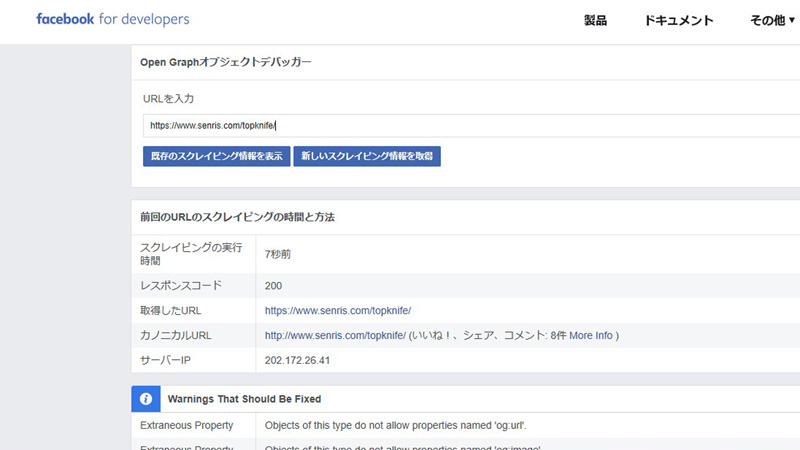
It will take some time for Facebook's crawler to scrape the OGP information of the new URLs for all blogs.
Therefore, if you want to recover the number of "Likes" as soon as possible, use "Open Graph Object Debugger", which is one of the Facebook Developers Tools, to manually scrape the number of "Likes". can be restored.

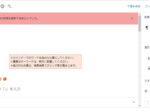
By selecting "get new scraping info" in the object debugger, a new OGP property for the new URL is built, and the number of Facebook likes for the old (http:) and new (https:) URLs The combined value will now be displayed.
In the above operation, as described above " Like I was able to recover the number 0 to 8.
2020.04.01 update
"Open Graph Object Debugger" is no longer available. Instead, use the new Facebook debugging tool Share Debugger is available.
2020.03.01 Postscript
In the dashboard plugin module ”social_buttons.php@hpbtool” provided by HPB, the OGP tag output code is old and the ”og:image” tag is the latest Facebook convention (“App ID” is a required property, The minimum image size was 200 x 200 pixels), so we fixed it as follows.
Using the function "get_the_post_thumbnail_url( int|WP_Post $post = null, string|array $size = 'post-thumbnail' )" released in WordPress version 4.4 (December 2017), set multiple OGP image tags. bottom.
<meta property="og:image" content="<?php echo esc_url(hpb_og_image_url($id)); ?>"/>↓
<meta property="og:image" content="<?php echo esc_url(hpb_get_thumbnail_url($id,'large')); ?>"/>
<meta property="og:image" content="<?php echo esc_url(hpb_get_thumbnail_url($id,'medium')); ?>"/>
Also add a function to generate the URL for the thumbnail image below.
This script is programmed to get the URL from the attached image of the post page if the thumbnail URL cannot be obtained from the fixed page or article page, and if it still cannot be obtained, return the URL of the theme image. I'm here.
function hpb_get_thumbnail_url( $id, $size ) {
	// OGP用サムネイル画像のURL取得
	$thumbnail_url = get_the_post_thumbnail_url($id, $size);

	if ( !$thumbnail_url ) {
		$query = 'post_parent=' . $id . '&post_type=attachment&post_mime_type=image';
		$postImg = get_children($query);
		if ( !empty($postImg) ){
			$keys = array_keys($postImg);
			$num = $keys[sizeOf($keys)-1];
			$thumb = wp_get_attachment_image_src($num, $size);
			$thumbnail_url = clean_url($thumb[0]);
		} else {
			$thumbnail_url = get_bloginfo('template_directory').'/screenshot.jpg';
		}

	}

	return $thumbnail_url;
}
2020.09.19 Postscript
It seems to be a specification change of Facebook, but currently, the above method alone is not good for old URLs. The number count is no longer reflected.
However, in Facebook's Share Debugger, the canonical URL (http:) correctly displays the number of previous shares, but the number of likes is incorrect. The button count will show '0'.
This problem can be fixed by modifying the Facebook "Like" button script. Details are in the article below.